A ReactJS Cheat Sheet
14 August 2019
For one of the projects at TTI, my supervisor wanted an interactive tool that would recommend roadside vegetation control methods using the criteria selected by the user. He recommended the use of React to help build this tool. Having never worked with React before, I saw it as an opportunity to master one of the most widely used Javascript frameworks.
This is a concise cheat sheet covering all the basics of React and noting all the helpful debugging solutions I discover. It will continue to be updated as I work with React.
Setting up React
Create React App.
One simple way to create a react application uses the Create React App feature in React. This sets up an entire project skeleton that you can build off on. This is by far my favourite way to start developing a single page application in React. This requires Node and npm. To create a project, run npx create-react-app name-of-your-app. This automatically sets up the JSX compilation structure, so all you need to do is run npm start to host the app locally and start developing.
Manually setting it up.
Another way is to set up the structure for React in your webpage yourself. I recommend this for existing projects that you want to add React to. Detailed instructions to do that can be found here. The process basically includes adding DOM containers like divs with ids in areas where you want React elements, and then including the React CDN links and scripts right before the closing </body> tag.
Althought React works with basic Javascript, JSX is the more intuitive way to code in React. Add JSX with the instructions here. You would install the JSX Babel preprocessor with npm.
To work with JSX from now on, you would have to create a src directory and create all your JSX files in it. Run npx babel --watch src --out-dir . --presets react-app/prod to start the preprocessor. The preprocessor basically translate the JSX code you write into vanilla Javascript in a separate file (outside of the src folder) with the same name, which you are including in your HTML.
Since a separate file with vanilla Javascript is generated, the preprocessor is only needed during development. Anyone else who downloads the webpage repository and runs it does not need to have the preprocessor installed.
Tip: To avoid the hassle of remembering the command to start the preprocessor, add this line of code into the scripts section of your automatically generated package.json file.
  "scripts": {
    "test": "echo \"Error: no test specified\" && exit 1",
    "watch": "npx babel --watch src --out-dir . --presets react-app/prod" /* Add this line */
  }
Now you can just run the command npm run watch to start the preprocessor.
Structure of React
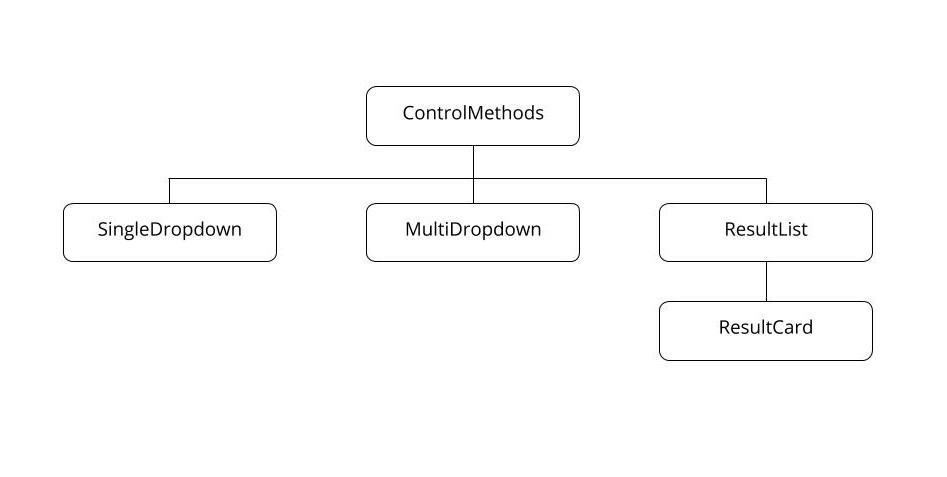
The terminology of React is confusing at first, with components and states being the first things you see. It’s best to think of each different React.Component as an individual tree with the main parent class as the trunk, and its children as the branches that could also split into smaller branches. A visual of my project structure has been added below as reference.
Usually, the main parent will have a state which keeps track of all the elements it contains. Whenever the element or its child changes, the main parent receive it as a signal to refresh the React element, creating the reactive app. The children could have their own states too but it is not necessary. Each class can have many React functions, but only the render() function is required.
Thinking of the structure as a tree, you can break each app you plan to build into smaller parts. For example, my web tool will have the main parent element acting as the data parser and state tracker. It will pass the information it has grabbed from the CSV database as “props” into its child elements dropdowns and result-list. The children classes can then access the passed information with this.props and the id of the information. Information can also be passed from child to parent by coding the child to run a function when a condition is met, and defining the function in the parent.
Cheat Sheet
Below is the structure of a basic React component, with commonly used member functions and how they are used.
// declaring the component
class ComponentName extends React.Component {

  // Use this constructor when you are passing data from parent
  // e.g. <ParentComponent initialList={this.data_to_pass_in} />

  constructor(props) {
    super(props);
    this.state = {
      list: props.initialList
    };
  }

  // OR where props aren't used in constructor

  constructor() {
    super();
    this.state = {
      list: []
    };
  }

  // Optional actions to take after Component is constructed
  // "Mounted" is when it is loaded onto the page

  componentWillMount() {
    // invoked once.
    // fires before initial 'render'
  }

  componentDidMount() {
    // good for AJAX: fetch, ajax, or subscriptions.
    // invoked once.
    // fires before initial 'render'
  }

  componentWillReceiveProps(nextProps) {
    // invoked every time component recieves new props(data).
    // does not fire before initial 'render'
  }

  componentDidUpdate(prevProps, prevState) {
    // invoked immediately after DOM updates
    // does not fire after initial 'render'
  }

  // Setting states for component, there are multiple ways

  // good for static state values
  this.setState({mykey: 'my new value'});

  // good for state data change
  this.setState((prevState, props) => {
    return {count: prevState.count + props.step};
  });

  // The only required function in a component

  render() {
    return <div />;
  }

}

export ComponentName;
Debugging solutions
The most important features of React that I’ve found are the {} brackets, the map() function and single line conditionals. The {} brackets allow you to exit the JSX in the return statements and use Javascript functions. The map(array, item) function is the best way to iterate through the list of objects you want to process before displaying them.
Single line conditionals can be used with {} in the return statements and are useful for choosing things to display. An snippet of my project code using all three is below.
class MethodList extends React.Component {
  render() {
    /* code that takes user selection and matches with database of options */
    /* return statement for render() */
    return (
      <div>
        /* Single line conditional */
        {filter.length == 0 && selState != "--choose an option--" && selDuration != "--choose an option--" ? <h2 class="listcontainer">No information available.</h2> : <h5></h5>}
        /* Single line conditional */
        {filter.length > 0 ? <h2 class="listcontainer">Results</h2> : <h5></h5>}
        /* map function */
        {filter.map((obj)=> {
          return <MethodCard result={obj} /> /* remember to RETURN when using map() to render elements! */
        })}
      </div>
    )
  }
}
NOTE: Remember to return in a map() function because {} bring you out of the main return statement.